From design to android, part 1
14 Mar 2017Thanks to amazing design platforms like Dribbble or MaterialUp, we, as developers have access to a huge catalog of well-made design concepts, interfaces, and proposals in clicks. Nevertheless, sometimes some details are almost impossible to implement and, at times, some UX aspects are not taken into account.
For that reason I thought that it would be nice to create a project about writing a series of posts picking some Dribbble or MaterialUp shots and implementing them on android, explaining some implementation details and UI/UX android tips which I think are important.
The concept
This is the concept that I’ve chosen for the first part, simple and complex enough to stop on some interesting topics like ConstraintLayout & chains, DataBinding, the importance of a performant UI hierarchies and scenes.
- The author of this concept Johnyvino, and has been published on MaterialUp
- The implementation can be found at this repository on GitHub.

Let’s get started!
Bottom sheets from the support library
In the shot, a bottom sheet is used for guiding the user through a buying process. In android you can find a couple of third-party libraries for implementing this kind of views, as the Umano’s AndroidSlidingUpPanel library.
Relatively recently, bottoms sheets were included into the design support library so I decided to using them to learn how they work.
Bottom sheets can be used in two ways, persistently supplementing the main view (using a BottomSheetBehavior attached to a viewgroup inside a CoordinatorLayout) or, if the information is shown in a modal way, we can use a BottomSheetDialogFragment.
For this example I’ve opted for the BottomSheetDialogFragment since the information –being less important that the main view and needing focus– is shown eventually in a modal way. In terms of code, this new element is used similar to a DialogFragment.
HomeActivity.java
OrderDialogFragment.newInstance(
  fakeProducts.get(position))
    .show(getSupportFragmentManager(),null);
OrderDialogFragment.java
  @Override
public View onCreateView(LayoutInflater inflater,
    ViewGroup container,Bundle savedInstanceState) {

    super.onCreateView(inflater,
        container, savedInstanceState);

    binding = FragmentOrderFormBinding.inflate(
        inflater, container, false);

    return binding.getRoot();
}
ConstraintLayout
This powerful layout presented at Google I/O ‘16 has recently came to their stable version (1.0.2 at the time of the writing).
Among other benefits, it allows to build complex and responsive layouts in a flat hierarchy of views.

A common advice in android is to avoid deep hierarchies of views inside our layouts, since damages the performance and the time that our UI will take to be drawn in the screen. That’s what we got for free when we use the ConstraintLayout.

Basically, ConstraintLayout works similar to RelativeLayout, this is defining relations between views and the screen. However, as well as being more performant, ConstraintLayout behaves really nice with Android Studio.
Among the benefits there are more interesting mechanisms like chains between views (when different views are reciprocally constrained) or elements like guidelines (guides that can be used for constraining views from a percentage or fixed distance).
Usage of chains
Let’s imagine that we have two views, A and B, both constrained to the screen edges right/left respectively. If we constrain A for being right of B, and B to be left A these views can be disposed in a special way, in the constraint layout realm this is known as a chain.
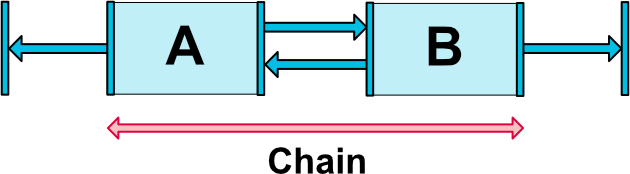
With the Android Studio layout editor is really easy to create and handle chains with the actions inside contextual menu of the layout editor. By default, Android Studio creates spread chains, where the views are spread out.
Chain types
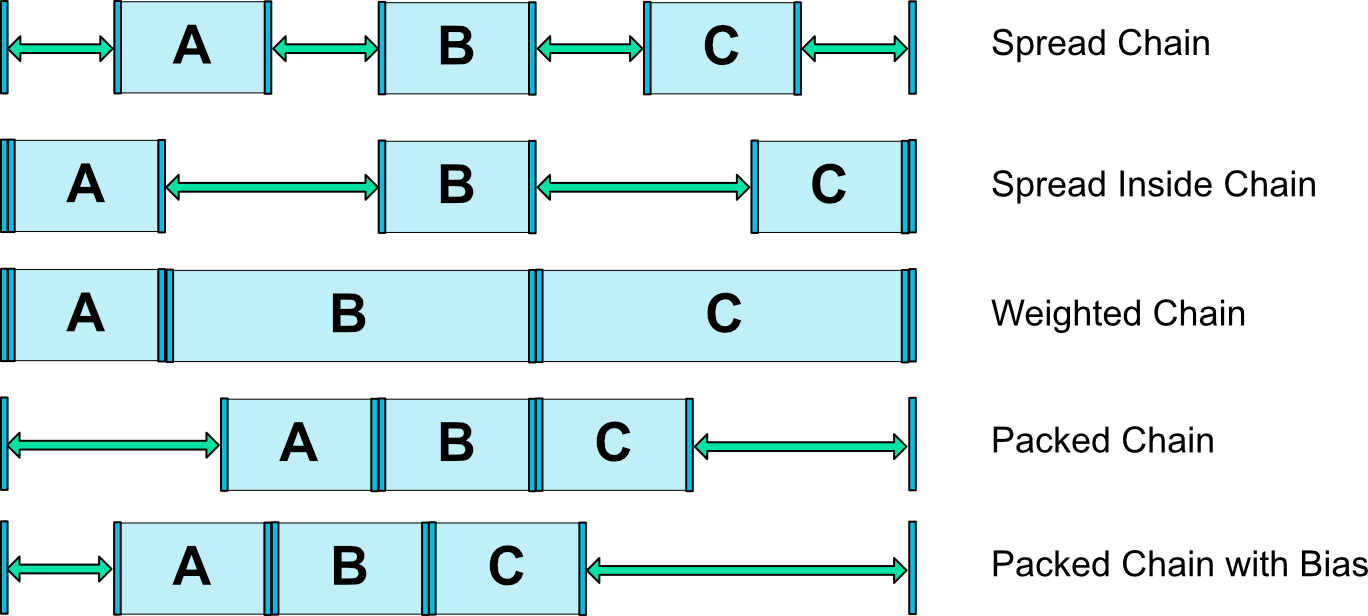
In this example only spread and packed chains are used, however, there are plenty of types to choose depending on your needs, lately Google has improved a lot their documentation about ConstraintLayout and chains, so there is no excuse to start using them!

Translating selected views
This could look simple, every time the user taps on a product parameter, the selected view is translated left to the bottom left labels.
![]()
For that, a new view is added to the parent layout where the user just tapped.
OrderDialogFragment.java
private void transitionSelectedView(View v) {
    final View selectionView = createSelectionView(v);

    binding.mainContainer.addView(selectionView);

    startCloneAnimation(selectionView, getTargetView(v));
}
And then, the view is translated, this is done making use of the method beginDelayedTransition from TransitionManager. That method, detects if there were changes in the layout and if so, performs the animation with the selected transition.
OrderDialogFragment.java
private void startCloneAnimation(View clonedView, View targetView) {
    clonedView.post(() -> {
        TransitionManager.beginDelayedTransition(
            (ViewGroup) binding.getRoot(), selectedViewTransition);

        // Fires the transition
        clonedView.setLayoutParams(SelectedParamsFactory
            .endParams(clonedView, targetView));
    });
}
ViewSwitcher
The ViewSwitcher, a widget maybe not very popular from the Android SDK which allows transitioning two views with in and out animations. For this case fits perfectly between the layout step changes in the purchase process.
fragment_order_form.xml
<ViewSwitcher
    android:id="@+id/switcher"
    android:layout_width="match_parent"
    android:layout_height="wrap_content"
    android:inAnimation="@anim/slide_in_right"
    android:outAnimation="@anim/slide_out_left"
    >

    <include
        android:id="@+id/layout_step1"
        layout="@layout/layout_form_order_step1"
        />

    <include
        android:id="@+id/layout_step2"
        layout="@layout/layout_form_order_step2"
        />
</ViewSwitcher>
OrderDialogFragment.java
private void showDeliveryForm() {
    binding.switcher.setDisplayedChild(1);
    initOrderStepTwoView(binding.layoutStep2);
}
Databinding
For the implementation of this concept I’ve used Databinding, for me, is confortable containing the whole hierarchy of the layout in a single object, however, there are other fancy Databading mechanisms that worth mentioning.
Saving click listeners
Since in these layouts are plenty of listeners to handle I’ve decided to send with Databinding a listener object to the binding, in the xml, each view will specify the method that is interested in and the event will be properly redirected to our object.
layout_form_order_step1.xml
<data>
    <variable
        name="listener"
        type="com.saulmm.cui.OrderDialogFragment.Step1Listener"
        />
</data>

<CircleImageView
    android:id="@+id/img_color_blue"
    style="@style/Widget.Color"
    android:onClick="@{listener::onColorSelected}"
    />

<CircleImageView
    android:id="@+id/img_color_blue"
    style="@style/Widget.Color"
    android:onClick="@{listener::onColorSelected}"
    />
OrderDialogFragment.java
layoutStep1Binding.setListener(new Step1Listener() {
    @Override
    public void onSizeSelected(View v) {
        // ...
    }

    @Override
    public void onColorSelected(View v) {
        // ...
    }
})
Saving views with Spannables + databinding + ConstraintLayout
Let’s think during a minute on how we’d implement this part of the concept

One solution could be set a vertical LinearLayout per item, wrapped into another horizontal LinearLayout which would include three items wrapped in one more LinearLayout which would contain the two labels and the two item containers.
Don’t do this at home
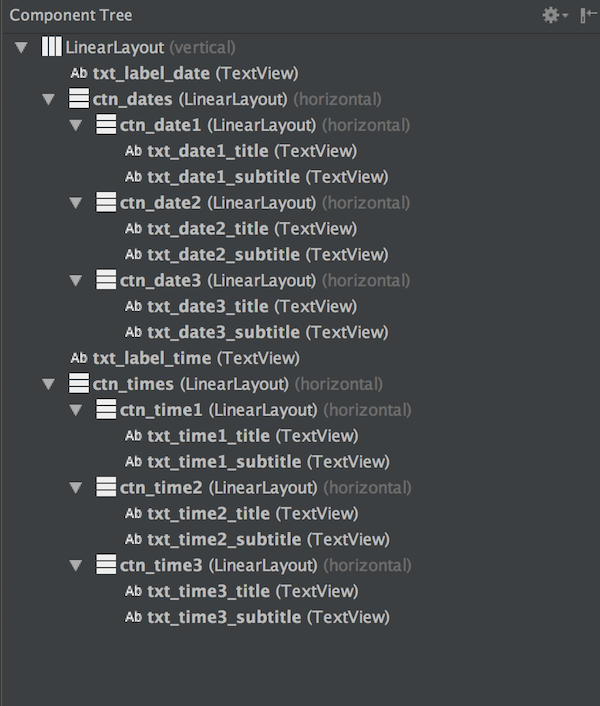
This doesn’t looks too good, right? We talked before about the importance of having a flat hierarchy, so ConstrainLayout as the container has to be the way to go.
A LinearLayout for each item is expensive, we could realize that we are showing just text in different sizes plus a border so maybe, in some way, we could make it work just one TextView per item.

Spannables
Spannables could do the work of showing the text in different sizes, and with a drawable, the border will be properly displayed. In that way we’ll save 3 views per item, far better from the first approach.
The problem using Spannables is that depending if we are on a time or a date item the amount of increased sized letters will change.
With Databinding and their amazing BindingAdapters mechanisms, we could create an attribute to set the increased number of letters.
layout_form_order_step2.xml
<TextView
    android:id="@+id/txt_time1"
    style="@style/Widget.DateTime"
    app:spanOffset="@{3}"
    />

<TextView
    android:id="@+id/txt_date1"
    style="@style/Widget.DateTime"
    app:spanOffset="@{2}"/>
OrderDialogFragment.java
@BindingAdapter("app:spanOffset")
public static void setItemSpan(View v, int spanOffset) {
    final String itemText = ((TextView) v).getText().toString();
    final SpannableString sString = new SpannableString(itemText);

    sString.setSpan(new RelativeSizeSpan(1.75f), itemText.
        length() - spanOffset, itemText.length(),
        Spannable.SPAN_EXCLUSIVE_EXCLUSIVE);

    ((TextView) v).setText(sString);
}
Scenes
Maybe the substantial point when implementing this concept is how to approach the transition between the book button and the confirmation view.
![]()
Is not so hard if we make use of smoke and mirrors. If we stop seeing the button as a button and looking it as a container, we could realize that we can reach the animation with scenes.
Being the first scene the whole form and the second one the confirmation view, with the button as a shared element. This shared element is a view with shares the same view across scenes, the framework will care of properly animating the view given a transition.
Once we have the idea the logic of changing two scenes is straightforward.
OrderDialogFragment.java
private void changeToConfirmScene() {
    final LayoutOrderConfirmationBinding confBinding =
        prepareConfirmationBinding();

    final Scene scene = new Scene(binding.content,
        ((ViewGroup) confBinding.getRoot()));

    scene.setEnterAction(onEnterConfirmScene(confBinding));

    final Transition transition = TransitionInflater
        .from(getContext()).inflateTransition(
              R.transition.transition_confirmation_view);

    TransitionManager.go(scene, transition);
}
Result
References
- ConstraintLayout Documentation - Android developers
- Mastering android drawables - Cyril Mottier
- Efficient android layouts - Dan Lew
- Plaid - Nick Butcher